It can be quite challenging to develop an Android application that should be published in several versions on the Android Market.
The main reason for this is the strange and unpredictable way that Android library projects work in Eclipse.
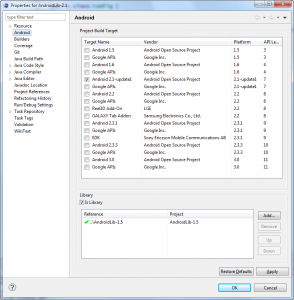
The official documentation explains how to setup library projects
but it does not explain all the quirks and workarounds needed to make them actually work in a real world application.
Another trap is the Proguard integration, which does not work if you have spaces in the path of your Eclipse projects.
| Quirk – No Spaces |
|---|
| Make sure there are no spaces in the path to the workspace or the names of the projects. |
| Proguard (which you really should use to obfuscate your application before publishing) is integrated using a batch file and the batch file does not work correctly with spaces in the path. |
Step 1 – Split your project into library and application parts
You probably want to reuse some of the code between projects, so you should create one or more library projects.
It would be easy to create one big library for all your reusable code, but then you would have to depend on the highest Android version which in turn would limit the handsets that your final application can run on.
Because of this I created not one library but several libraries for the different versions of Android.
I currently have the following library projects:
AndroidLicensinglibrary project as described in the Android Licensing GuideAndroidLib-1.5library project with reusable classes – depending on Android 1.5AndroidLib-2.1library project with reusable classes – depending on Android 2.1 and AndroidLib-1.5
| Quirk – Adding library dependencies to a library does not update in all projects |
|---|
| When you add a new library dependency to one of your library projects the dependencies from the application projects are not updated. |
| Workaround: Remove library dependency in your application project and add it again. |
Step 2 – Write the application
Now you write the real application and need a new project for it.
Variant 1 – Library Project from the beginning
This is the cleaner variant.
From the start I create this project as a library project and fill it with the application code.
In order to run it we will need to do step 3 immediately.
Variant 2 – Application Project first and then convert it into a Library Project
This is the variant if I do not yet know in how many forms I want to publish the application on the market or if I already have a running application project.
In this case I make it an application project and develop it normally until I decide to proceed to step 3.
Before we go to step 3 simply convert the project into a library project.
Step 3 – Create one application project for every variant on the Market
First you have to have to think how many different deployment types of your application you want to publish on the market.
If you only want to publish the free version it doesn’t matter anyway, but if you plan for a paid version you probably need to decide.
Here is the terminology I use:
- Pro is the paid version with full features.
- Demo is the demo version with a few features disabled.
- Ad is the free version that shows advertisements – it might contain all features of the Pro version or it might limit the functionality a bit.
- Free is the free version with full features.
It is well worth to think about what you want to achieve by providing several deployment types.
- The Demo version should have enough limitations so that users are urged to buy the Pro version but not so annoyed that they will simply delete your application.
- The Ad version should (partially) compensate the lost sales by ad click payments and still incentivate the users to buy the full version.
Here is the example that I am going to use for the rest of this tutorial:
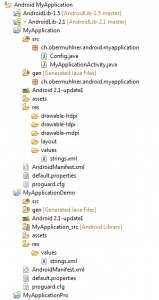
MyApplicationlibrary project containing the application code – depends on some of the other library projectsMyApplicationProapplication project – depending on MyApplicationMyApplicationDemoapplication project – depending on MyApplication
Step 4 – Distribute resources and assets between projects
The resources and assets must be distributed between the library projects (especially where your application code lives) and the application projects.
Distribute resources
| Feature – Resources are merged from libraries |
|---|
| The various resources found in library and application projects are correctly merged. Even single values (e.g. strings) from application projects override default values in the library projects correctly. |
The application projects should not contain any resources that you already have in your library projects.
If you generated the application projects with the Eclipse wizard you probably have some string resources (app_name and hello) and a drawable (icon).
Delete them.
Then copy only the resources you want different for each deployment into the application projects.
The files for the MyApplication example look like this:

If you use custom XML attributes you are in for a bad surprise:
| Quirk – Custom XML attributes |
|---|
| For some reason custom XML attributes specified in libraries do not work correctly and are parsed with the namespace of the application project. |
| This is rather painful. The only workaround is to copy all the XML files that use the custom XML attributes into all application projects and change the namespace. In my applications these are typically a layout XML files so I have to several duplicates. |
This is an example layout file with custom XML attributes for the Pro application project.
<?xml version="1.0" encoding="utf-8"?>
<-- MyApplication Pro - xmlns:example points to 'pro' package -->
<org.obermuhlner.android.lib.ExampleView
    xmlns:android="http://schemas.android.com/apk/res/android"
    xmlns:example="http://schemas.android.com/apk/res/ch.obermuhlner.android.myapplication.pro"
    android:id="@+id/exampleView"
    android:layout_width="fill_parent"
    android:layout_height="fill_parent"
    example:my_text="Hello World"
    example:my_value="123"
    >
This is an example layout file with custom XML attributes for the Demo application project.
<?xml version="1.0" encoding="utf-8"?>
<-- MyApplication Demo - xmlns:example points to 'demo' package-->
<org.obermuhlner.android.lib.ExampleView
    xmlns:android="http://schemas.android.com/apk/res/android"
    xmlns:example="http://schemas.android.com/apk/res/ch.obermuhlner.android.myapplication.demo"
    android:id="@+id/exampleView"
    android:layout_width="fill_parent"
    android:layout_height="fill_parent"
    example:my_text="Hello World"
    example:my_value="123"
    >
Unfortunately I am now forced to maintain two copies of the XML file.
Distribute assets
| Quirk – Assets are not merged from libraries |
|---|
| Asset files are only taken from the application project, assets in library projects are ignored. |
| The only workaround is to copy the assets into all application projects. |
Clean AndroidManifest.xml
| Quirk – AndroidManifest.xml is not merged from libraries |
|---|
AndroidManifest.xml files from library projects are not merged with application projects. |
Each AndroidManifest.xml in an application project needs to be complete. This will lead to some duplication. |
Actually it makes sense to ignore the AndroidManifest.xml from library projects, because you might want to deploy the application on very different devices with different permissions, version and maybe even launching different activities.
A typical AndroidManifest.xml in the application library project looks like this:
<-- MyApplication - main library application -->
<manifest xmlns:android="http://schemas.android.com/apk/res/android"
      package="ch.obermuhlner.android.myapplication"
      android:versionCode="3"
      android:versionName="1.2">
    <uses-sdk android:minSdkVersion="7" />

</manifest>
A typical AndroidManifest.xml in the Pro application project looks like this:
<-- MyApplication Pro -->
<manifest xmlns:android="http://schemas.android.com/apk/res/android"
      package="ch.obermuhlner.android.myapplication.pro"
      android:versionCode="3"
      android:versionName="1.2">
    <uses-sdk android:minSdkVersion="7" />

    <uses-permission android:name="android.permission.READ_PHONE_STATE" />
    <uses-permission android:name="com.android.vending.CHECK_LICENSE" />

    <application
    	android:icon="@drawable/icon"
    	android:label="@string/app_name">

        <activity
            android:name="ch.obermuhlner.android.myapplication.ExampleActivity"
            android:label="@string/app_name">

            <intent-filter>
                <action android:name="android.intent.action.MAIN" />
                <category android:name="android.intent.category.LAUNCHER" />
            </intent-filter>
        </activity>
    </application>
</manifest>
A typical AndroidManifest.xml in the Demo application project looks like this:
<-- MyApplication Demo - no permissions for license checking -->
<manifest xmlns:android="http://schemas.android.com/apk/res/android"
      package="ch.obermuhlner.android.myapplication.demo"
      android:versionCode="3"
      android:versionName="1.2">
    <uses-sdk android:minSdkVersion="7" />

    <application
    	android:icon="@drawable/icon"
    	android:label="@string/app_name">

        <activity
            android:name="ch.obermuhlner.android.myapplication.ExampleActivity"
            android:label="@string/app_name">

            <intent-filter>
                <action android:name="android.intent.action.MAIN" />
                <category android:name="android.intent.category.LAUNCHER" />
            </intent-filter>
        </activity>
    </application>
</manifest>
Your free application should not ask for CHECK_LICENSE, since you want to ask for the minimal permissions that your application needs.
The Android Market will not allow to publish a free application with CHECK_LICENSE permission.
Step 5 – Check the deployment type in the application code
Obviously the application should behave differently depending on the deployment type.
The following code snippet shows how to check the unique id of your application since Android 1.6:
	public static boolean isDemo(Context context) {
		// check application package name in Android 1.6 and later
		return context.getApplicationInfo().packageName.endsWith("demo");
	}
In Android 1.5 the Context.getApplicationInfo() method does not yet exist.
I am still looking for the best workaround in Android 1.5.
For the time being one trick I found was to use a resource with different values in the different deployments:
	public static boolean isDemo(Context context) {
		// check a resource in Android 1.5
		return context.getResources().getInteger(R.integer.magicValue)  == 1;
	}
Another trick involves providing a Java class which only exists in the Demo application and checking it using reflection:
	public static boolean isDemo(Context context) {
		try {
			// make sure the class ch.obermuhlner.android.myapplication.demo.DemoConfig is not obfuscated by proguard
			Class<?> clazz = Class.forName("ch.obermuhlner.android.myapplication.demo.DemoConfig");
			return clazz != null;
		} catch (ClassNotFoundException e) {
			return false;
		}
	}
Step 6 – Test really well
It is difficult to get everything right because the behaviour of library projects is so unpredictable.
Here a little check list:
- Check pro/demo functionality differences in all deployed versions
- Check application name and icon in all deployed versions
- Check resources, such as translated strings in all deployed versions
- Check assets, such as HTML help files or images in all deployed versions
- Check licensing behaviour in all deployed versions
- Create signed and obfuscated application package for all deployed versions

